

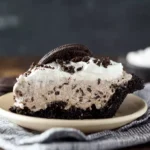
Oreo Pudding Pie
- Prep Time: 20 minutes
- Total Time: 4 hours 20 minutes (including chilling:4 hours)
Description
This Oreo Pudding Pie is a creamy, no-bake dessert that’s incredibly easy to make and always a crowd favorite. It features a rich Oreo crust, a smooth cookies-and-cream pudding filling, and a fluffy whipped topping layer. With its light texture and chocolatey crunch, this dessert is perfect for busy days, family gatherings, or when you want something sweet without baking.
Ingredients
For the Crust
- 2 cups crushed Oreo cookies
- 5 tablespoons melted butter
For the Filling
- 1 package (3.4 oz) instant vanilla pudding mix
- 1 ½ cups cold milk
- 1 cup crushed Oreos
- 1 cup whipped topping
For the Topping
- 1 ½ cups whipped topping
- Extra Oreo cookies, crushed or whole
Instructions
Mix crushed Oreo cookies with melted butter until combined. Press firmly into a pie dish, covering the bottom and sides. Chill in the refrigerator for 20–30 minutes until set.
In a bowl, whisk the pudding mix with cold milk until thickened, about 2–3 minutes.
Fold in crushed Oreos and whipped topping gently to create a light and creamy texture.
Spread the pudding mixture evenly into the chilled crust, smoothing the top.
Spread whipped topping over the pie and garnish with crushed or whole Oreos.
Refrigerate for at least 4 hours, or until fully set.
Slice and serve chilled for the best texture.
Notes
- Use cold milk to help the pudding set properly
- Chill the crust before adding filling to keep it firm
- Fold gently to maintain a light texture
- Allow enough chill time for clean slices
- Use full-fat milk for a creamier result
Nutrition
- Serving Size: Per serving
- Calories: 350
Variations
- Use chocolate pudding instead of vanilla
- Add mini chocolate chips for extra texture
- Mix in cream cheese for a richer filling
- Use golden Oreos for a different flavor
- Add a drizzle of chocolate syrup on top
Serving Suggestions
- Serve chilled straight from the refrigerator
- Add extra whipped cream on each slice
- Drizzle chocolate syrup before serving
- Pair with coffee or cold milk
- Garnish with whole Oreos for a nice presentation
Tips
- Crush Oreos finely for a firm crust
- Use a hot knife for cleaner slices
- Do not overmix the filling
- Store covered to keep it fresh
- Let sit a few minutes before slicing for easier serving
Prep Time / Chill Time / Total Time
Prep Time: 20 minutes
Chill Time: 4 hours
Total Time: 4 hours 20 minutes
Nutritional Info (Approx.)
Per serving:
Calories: 350
Protein: 4g
Carbohydrates: 32g
Fat: 22g
Sugar: 20g
FAQs
Can I make Oreo Pudding Pie ahead of time?
Yes, this pie is perfect for making ahead. In fact, preparing it the day before allows the pudding to fully set and the flavors to blend nicely. Just keep it covered in the refrigerator until ready to serve.
Can I use homemade whipped cream instead of whipped topping?
Absolutely. Homemade whipped cream works great and gives a fresher taste. Just whip heavy cream with a bit of sugar until soft peaks form and use it the same way.
Why is my filling too soft?
This usually happens if the pudding didn’t set long enough or if too much liquid was added. Make sure to follow the correct milk measurements and allow enough chilling time.
Can I freeze this pie?
Yes, you can freeze it for a firmer texture. Let it thaw slightly before serving so it’s easier to slice and enjoy.
How long does it last in the fridge?
It can last up to 3–4 days when stored in an airtight container in the refrigerator, while still maintaining good texture and flavor.