

Frozen S’mores
- Prep Time: 20 minutes
- Cook Time: Freeze Time: 6 hours
- Total Time: Total Time: 6 hours 20 minutes
Description
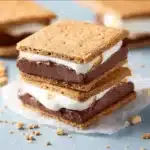
Frozen S’mores are a fun, no-bake dessert that brings all the classic campfire flavors into a cool, creamy treat. With layers of graham crackers, fluffy marshmallow filling, and rich chocolate pudding, these bars are perfect for hot days when you want something sweet without turning on the oven. They’re easy to make ahead, slice beautifully, and are always a hit with both kids and adults.
Ingredients
- 1 box graham crackers
- 1 package (3.4 oz) instant chocolate pudding mix
- 1 ½ cups cold milk
- 1 container (8 oz) whipped topping
- 1 jar marshmallow creme (7 oz)
Instructions
Line a baking dish (9×13) with parchment paper for easy removal.
Arrange a single layer of graham crackers on the bottom of the pan, breaking pieces as needed to fit.
Whisk pudding mix with cold milk until thickened. Spread evenly over the graham crackers.
Place another layer of graham crackers over the chocolate pudding.
In a bowl, mix marshmallow creme with whipped topping until smooth and fluffy.
Spread the marshmallow mixture evenly over the graham layer.
Finish with a final layer of graham crackers.
Freeze for at least 6 hours, or until fully set.
Let sit for a few minutes, then cut into squares and serve frozen.
Notes
- Use cold milk so the pudding sets quickly
- Freeze long enough to get firm, clean layers
- Do not overmix the marshmallow mixture
- Use parchment paper for easy removal
- Let sit briefly before cutting to avoid cracking
Nutrition
- Serving Size: Per serving
- Calories: 290
Variations
- Use vanilla pudding instead of chocolate
- Add a layer of peanut butter for extra richness
- Dip finished bars in melted chocolate
- Use chocolate graham crackers for deeper flavor
- Add mini chocolate chips to the marshmallow layer
Serving Suggestions
- Serve straight from the freezer
- Pair with cold milk or iced coffee
- Drizzle with chocolate syrup before serving
- Add crushed graham crackers on top
- Serve as bite-sized squares for parties
Tips
- Use a sharp knife for clean slices
- Press graham crackers gently to keep layers even
- Store in an airtight container to prevent freezer burn
- Cut into portions before freezing for convenience
- Use full-fat whipped topping for best texture
Prep Time / Freeze Time / Total Time
Prep Time: 20 minutes
Freeze Time: 6 hours
Total Time: 6 hours 20 minutes
Nutritional Info (Approx.)
Per serving:
Calories: 290
Protein: 4g
Carbohydrates: 42g
Fat: 12g
Sugar: 26g
FAQs
Can I make Frozen S’mores ahead of time?
Yes, this dessert is perfect for making ahead. You can prepare it a day in advance and keep it frozen until serving. This actually improves the texture, making the layers firmer and easier to slice neatly.
Can I use homemade whipped cream instead of whipped topping?
Yes, homemade whipped cream works well. Just make sure it’s whipped to stable peaks so it holds its structure when frozen.
Why are my layers sliding when cutting?
This usually happens if the dessert hasn’t frozen long enough. Make sure to freeze it fully so each layer holds together properly when sliced.
Can I freeze this longer than one day?
Yes, you can store it in the freezer for up to a week. Just keep it tightly covered to prevent it from drying out or absorbing freezer odors.
How do I get clean slices?
Let the dessert sit at room temperature for a few minutes before cutting, and use a sharp knife wiped clean between each slice for neat edges.