
When it comes to simple, flavorful, and hearty meals, Dutch oven chicken and rice is a winning choice. Combining tender, juicy chicken with fluffy, flavorful rice, this one-pot wonder is perfect for busy weeknights or leisurely weekend dinners. The beauty of the dish lies in its simplicity, yet its depth of flavor makes it feel like a culinary masterpiece.
Using a Dutch oven enhances the cooking process by providing even heat distribution and excellent moisture retention. The result? A meal that’s full of rich, savory flavors with minimal cleanup. Whether you’re new to Dutch oven cooking or a seasoned pro, this Dutch oven chicken and rice is a must-try for anyone who enjoys easy-to-make comfort food.
Table of Contents
Why Use a Dutch Oven?
The Dutch oven is an incredibly versatile kitchen tool that has been used for centuries to make everything from stews to roasts. It’s perfect for Dutch oven chicken and rice because it maintains a consistent temperature, ensuring even cooking without drying out. The heavy lid seals in moisture, resulting in tender rice and juicy chicken every time.
Dutch oven chicken and rice : Ingredients Breakdown
The Chicken: Flavor and Texture
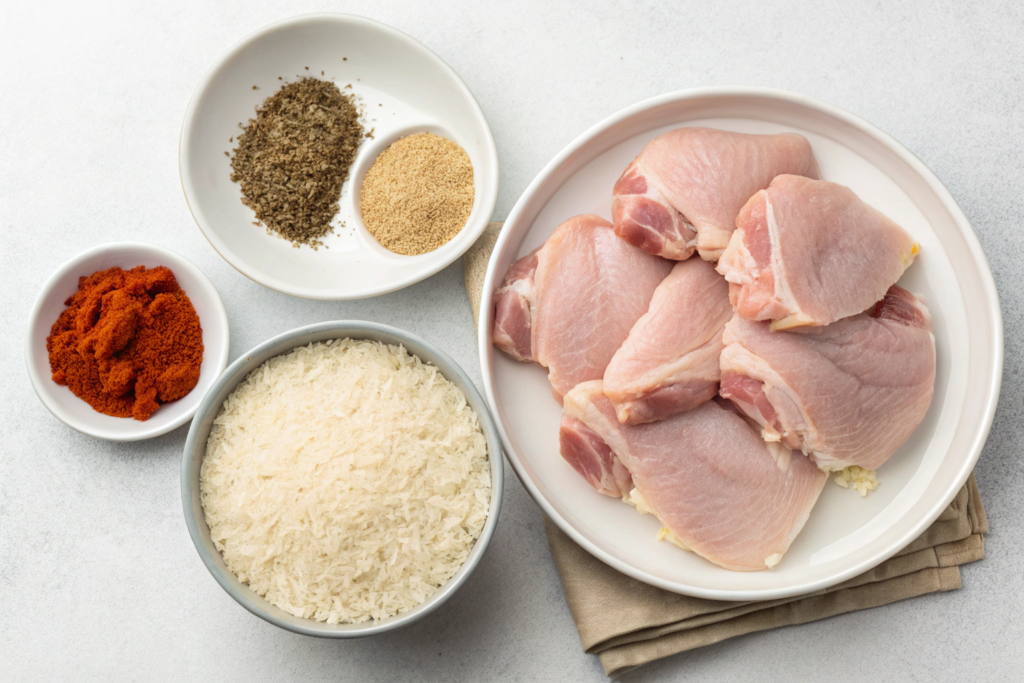
Chicken thighs are the go-to choice for this Dutch oven chicken and rice recipe. Specifically, bone-in, skin-on chicken thighs are recommended for Dutch oven chicken and rice because they offer a richer, more intense flavor than boneless, skinless options. The fat in the skin renders during cooking, seeping into the rice and imparting incredible depth of flavor
Chicken Options:
- Bone-in, skin-on chicken thighs: Optimal for flavor and juiciness.
- Boneless chicken thighs: A lighter option, but still flavorful.
- Chicken breasts: Leaner, but can dry out more easily.
- Whole chicken, cut into pieces: For a more rustic and hearty meal.
Rice: What’s the Best Choice?
White rice is the most commonly used variety for this Dutch oven chicken and rice due to its shorter cooking time and its ability to absorb flavors well. However, if you’re looking for more texture and complexity, you can opt for brown rice or even wild rice, though these will require adjustments in cooking time and liquid.
Rice Options:
- White rice: Absorbs flavors quickly and cooks evenly.
- Brown rice: Nutty flavor, but requires more liquid and a longer cooking time.
- Wild rice: Adds texture and a more earthy flavor, but takes longer to cook.
For detailed guidance on selecting the right type of rice for various recipes, check out Different Types of Rice for Cooking.
Essential Seasonings
The seasoning is what brings this Dutch oven chicken and rice to life. A well-balanced blend of garlic powder, onion powder, smoked paprika, thyme, and black pepper creates a deep, savory flavor profile. For those who enjoy a bit more heat, a dash of cayenne pepper or crushed red pepper flakes can add a welcome kick.
Recommended Seasonings:
- Garlic powder: Enhances the overall flavor.
- Onion powder: Adds depth to the dish.
- Smoked paprika: For a slightly smoky undertone.
- Thyme: Offers a subtle earthiness.
- Black pepper: Adds a touch of spice.
- Lemon zest: For a burst of brightness at the end.
Step-by-Step Cooking Dutch oven chicken and rice
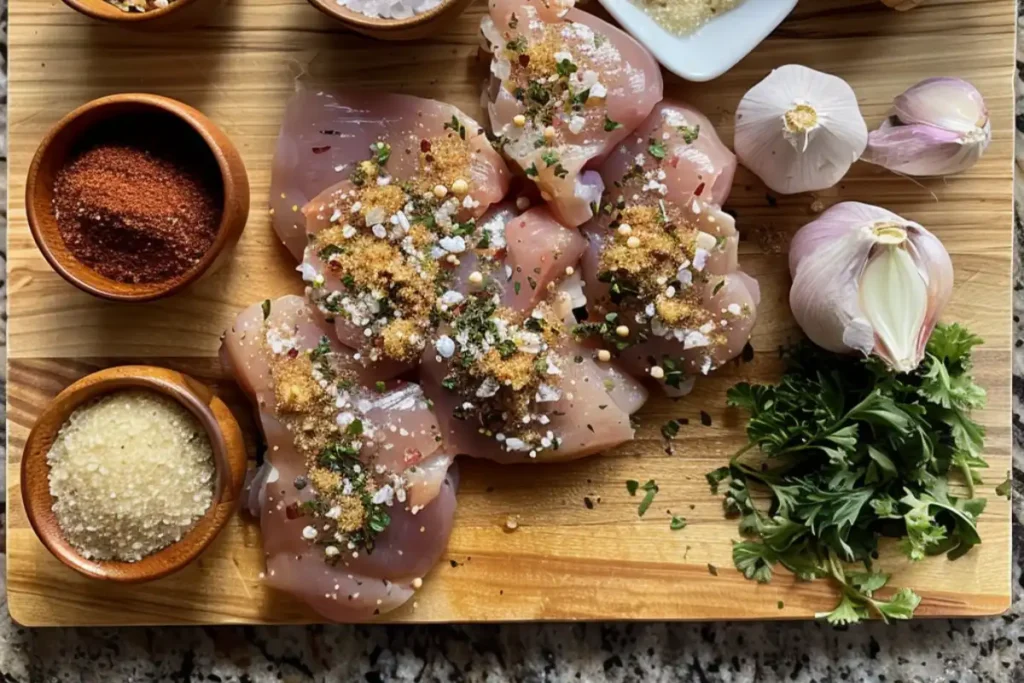
Step 1: Seasoning the Chicken
Before you start cooking, you’ll want to ensure your chicken is thoroughly seasoned. Generously sprinkle garlic powder, onion powder, smoked paprika, salt, and pepper over the chicken, making sure to rub the spices into the meat for maximum flavor. Allow the chicken to rest for a few minutes, letting the spices penetrate the surface.
- Pro Tip: Letting the chicken come to room temperature before cooking helps it brown more evenly.
Step 2: Searing the Chicken
Heat a tablespoon of olive oil in your Dutch oven over medium-high heat. Once hot, add the chicken thighs skin-side down and cook for about 3-4 minutes per side, or until the skin is crispy and golden brown. This searing step is crucial for locking in moisture and building flavor.
- Tip: Don’t overcrowd the pot. Work in batches if necessary to ensure even browning.
Step 3: Sautéing the Aromatics and Toasting the Rice
Once the chicken is browned, remove it from the pot and set it aside. In the same pot, add chopped onions and minced garlic, sautéing until the onions are translucent and fragrant. This should take about 3-4 minutes. Next, add the uncooked rice and toast it for 2-3 minutes, stirring frequently. Toasting the rice helps develop a richer flavor and ensures it absorbs the broth evenly.
- Pro Tip: Toasting the rice before adding liquid enhances its flavor and texture.
Step 4: Adding the Broth and Returning the Chicken
Pour in chicken broth (or a mix of broth and water) and stir well, scraping up any browned bits from the bottom of the pot. These bits are packed with flavor and will elevate the dish. Once the broth is added, return the chicken thighs to the pot, nestling them into the rice. Bring everything to a gentle simmer.
- Tip: For an added layer of flavor, try adding a splash of white wine or lemon juice at this stage.
Step 5: Baking the Chicken and Rice
Cover the Dutch oven with its lid and transfer it to a preheated oven at 375°F. Allow it to bake for 40-45 minutes, or until the rice is tender and the chicken reaches an internal temperature of 165°F. Try to avoid lifting the lid during baking, as this releases the steam needed to cook the rice properly.
- Pro Tip: For a crispier chicken skin, remove the lid during the last 10 minutes of baking.
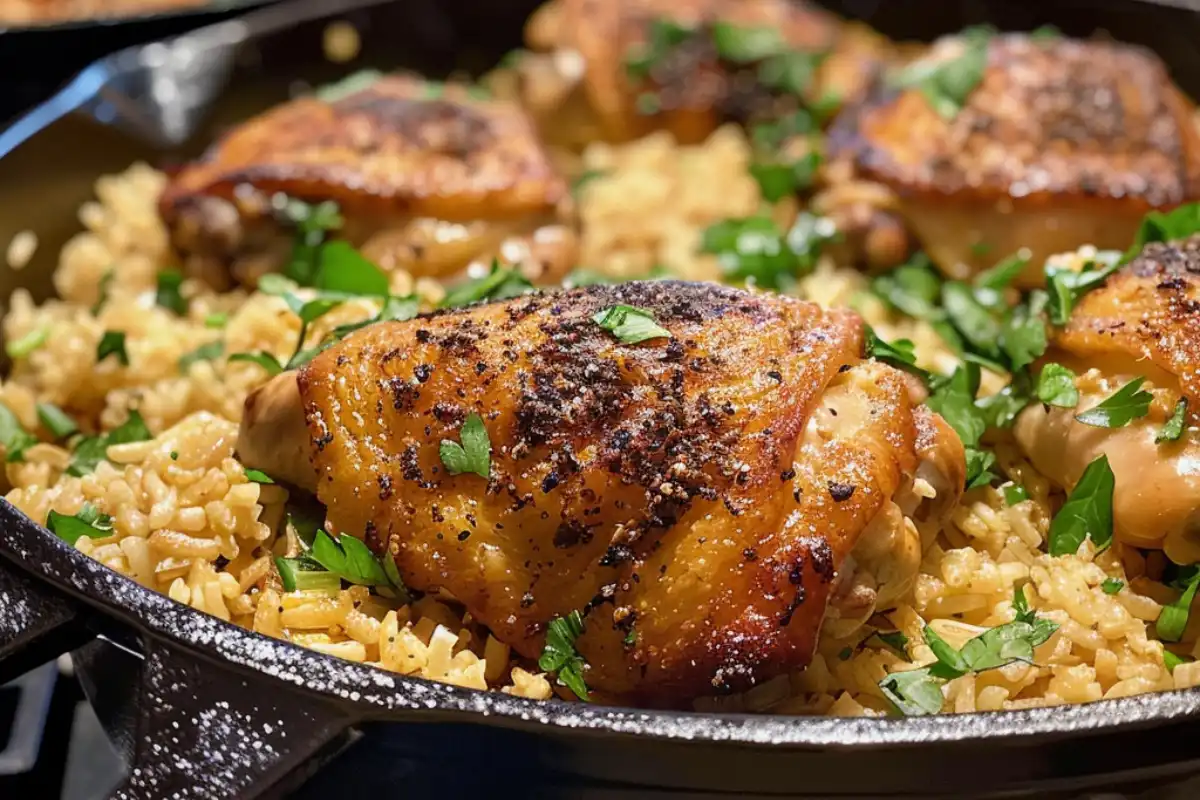
Dutch oven chicken and rice : Serving Suggestions
Once your Dutch oven chicken and rice is ready, garnish it with freshly chopped parsley or cilantro for added freshness. This dish pairs wonderfully with a variety of sides, from simple salads to roasted vegetables.
Suggested Side Dishes:
- Spinach Salad with Pears: The sweetness of the pears pairs perfectly with the savory chicken and rice. Try Spinach Salad with Pears for a light and refreshing side.
- Green Beans with Bacon: For a heartier side, consider Green Beans with Bacon. The smoky bacon complements the richness of the chicken and rice.
For more recipe variations, try Creamy Shrimp Pasta Pico de Gallo for a flavor-packed alternative with bold, spicy flavors.
Variations of Dutch Oven Chicken and Rice
Mediterranean Chicken and Rice
- For a Mediterranean twist, add lemon juice, kalamata olives, oregano, and feta cheese to the Dutch oven chicken and rice. This variation brings bright, tangy flavors that contrast beautifully with the richness of the chicken and rice.
Cajun-Style Chicken and Rice
- Spice things up with a Cajun-inspired version by incorporating Cajun seasoning, andouille sausage, and bell peppers. This variation adds bold flavors and a touch of heat, perfect for those who enjoy a bit of spice in their meals.
Dairy-Free and Gluten-Free Options
- If you need to adapt the Dutch oven chicken and rice for dietary restrictions, it’s easy to make it dairy-free by using olive oil instead of butter. For a gluten-free version, simply use a gluten-free chicken broth and check that your seasonings are gluten-free.
If you’re in the mood for something sweet, finish off your meal with a slice of Chocolate and Vanilla Cake
Storage and Reheating
Storing Leftovers
- Leftovers can be stored in an airtight container in the refrigerator for up to 3-5 days. The dish also freezes well for up to three months—just be sure to let it cool completely before transferring it to the freezer.
Reheating Instructions
To reheat, place the chicken and rice in an oven-safe dish, cover with foil, and bake at 350°F until heated through. Alternatively, you can microwave individual portions with a splash of broth to prevent the rice from drying out.
Dutch oven chicken and rice is a comforting, flavorful meal that’s perfect for any occasion. Its simplicity and depth of flavor make it a staple in many households, and the versatility of the recipe means you can tweak it to fit your personal taste preferences. Whether you stick to the classic recipe or experiment with variations like Mediterranean or Cajun-style, you’ll have a meal that’s sure to please.
For more one-pot meal ideas, don’t miss out on Quick and Easy Chicken Noodle Soup ,another comforting recipe that uses similar techniques to create a delicious, hearty dish.
FAQs About Dutch Oven Chicken and Rice
1. Can you cook rice and chicken together in a Dutch oven?
- Yes! The Dutch oven is ideal for cooking both chicken and rice together. Its even heat distribution ensures that the rice absorbs all the flavors from the chicken and broth, making for a deliciously balanced dish.
2. What type of chicken is best for this recipe?
- Bone-in, skin-on chicken thighs are the best choice for their flavor and moisture. However, boneless thighs or chicken breasts can also work, though they may require adjustments in cooking time.
3. How long should you bake chicken and rice in a Dutch oven?
- Baking the dish at 375°F for about 40-45 minutes is typically enough to ensure both the chicken and rice are fully cooked. The chicken should reach an internal temperature of 165°F for safe consumption.
4. Can you use brown rice instead of white rice?
- Yes, but keep in mind that brown rice takes longer to cook and requires more liquid than white rice. Adjust the broth and cooking time accordingly.

Dutch Oven Chicken and Rice
- Prep Time: 10 minutes
- Cook Time: 45 minutes
- Total Time: 55 minutes
- Category: Lunch
- Method: Dutch Oven
Description
This Dutch Oven Chicken and Rice is a comforting one-pot meal featuring juicy, seasoned chicken thighs and fluffy, flavorful rice. Perfect for a cozy dinner, this dish is packed with savory herbs and rich textures, making it a family favorite! 🍗🍚
Ingredients
For the Chicken:
- 4 bone-in, skin-on chicken thighs (or 2 chicken breasts)
- 1 tsp salt
- ½ tsp black pepper
- 1 tsp smoked paprika
- 1 tsp garlic powder
- 1 tbsp olive oil
- 1 tbsp butter
For the Rice:
- 1 small onion, diced
- 3 cloves garlic, minced
- 1 cup long-grain white rice
- 2 cups chicken broth
- 1 tsp dried thyme (or Italian seasoning)
- ½ tsp salt
- ¼ tsp black pepper
- ½ cup frozen peas (optional)
- 1 tbsp fresh parsley, chopped (for garnish)
Instructions
-
Season & Sear the Chicken:
- Pat chicken dry and season with salt, black pepper, smoked paprika, and garlic powder.
- Heat olive oil and butter in a Dutch oven over medium-high heat.
- Sear chicken skin-side down for 4-5 minutes, then flip and cook for another 2 minutes.
- Remove chicken and set aside.
-
Sauté the Aromatics:
- In the same Dutch oven, add onion and garlic, cooking for 2 minutes until softened.
- Stir in rice, salt, black pepper, and thyme, toasting for 1 minute.
-
Cook the Rice & Chicken Together:
- Pour in chicken broth and bring to a simmer.
- Nestle the seared chicken into the rice, skin-side up.
- Cover and bake in a preheated oven at 350°F (175°C) for 30 minutes.
-
Final Touches:
- Remove from the oven and let rest for 5 minutes.
- Stir in frozen peas (if using) and fluff the rice with a fork.
- Garnish with fresh parsley and serve warm.
Notes
- For extra richness, stir in 2 tbsp of heavy cream or Parmesan cheese before serving.
- For a spicier version, add red pepper flakes or cayenne to the seasoning mix.
- For a whole-grain option, use brown rice and increase the baking time to 45 minutes.
1 thought on “Dutch Oven Chicken and Rice”